2015年1月12日 星期一

ZFS snapshot & rollback 快照及還原


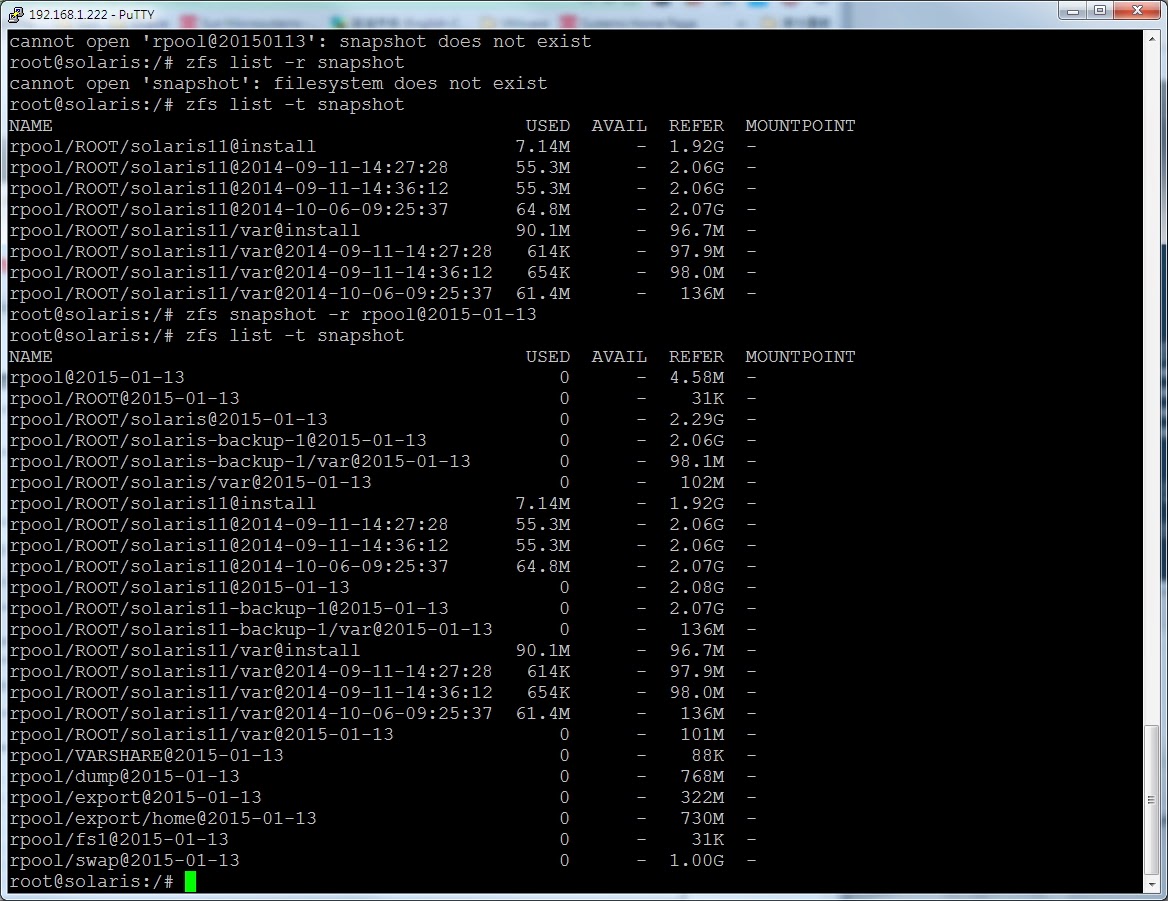
  • 建立整個rpool的快照

root@solaris:/# zfs list -t snapshot
NAME                                           USED  AVAIL  REFER  MOUNTPOINT
rpool/ROOT/solaris11@install                  7.14M      -  1.92G  -
rpool/ROOT/solaris11@2014-09-11-14:27:28      55.3M      -  2.06G  -
rpool/ROOT/solaris11@2014-09-11-14:36:12      55.3M      -  2.06G  -
rpool/ROOT/solaris11@2014-10-06-09:25:37      64.8M      -  2.07G  -
rpool/ROOT/solaris11/var@install              90.1M      -  96.7M  -
rpool/ROOT/solaris11/var@2014-09-11-14:27:28   614K      -  97.9M  -
rpool/ROOT/solaris11/var@2014-09-11-14:36:12   654K      -  98.0M  -
rpool/ROOT/solaris11/var@2014-10-06-09:25:37  61.4M      -   136M  -
root@solaris:/#


root@solaris:/# zfs snapshot -r rpool@2015-01-13
root@solaris:/# zfs list -t snapshot
NAME                                           USED  AVAIL  REFER  MOUNTPOINT
rpool@2015-01-13                                  0      -  4.58M  -
rpool/ROOT@2015-01-13                             0      -    31K  -
rpool/ROOT/solaris@2015-01-13                     0      -  2.29G  -
rpool/ROOT/solaris-backup-1@2015-01-13            0      -  2.06G  -
rpool/ROOT/solaris-backup-1/var@2015-01-13        0      -  98.1M  -
rpool/ROOT/solaris/var@2015-01-13                 0      -   102M  -
rpool/ROOT/solaris11@install                  7.14M      -  1.92G  -
rpool/ROOT/solaris11@2014-09-11-14:27:28      55.3M      -  2.06G  -
rpool/ROOT/solaris11@2014-09-11-14:36:12      55.3M      -  2.06G  -
rpool/ROOT/solaris11@2014-10-06-09:25:37      64.8M      -  2.07G  -
rpool/ROOT/solaris11@2015-01-13                   0      -  2.08G  -
rpool/ROOT/solaris11-backup-1@2015-01-13          0      -  2.07G  -
rpool/ROOT/solaris11-backup-1/var@2015-01-13      0      -   136M  -
rpool/ROOT/solaris11/var@install              90.1M      -  96.7M  -
rpool/ROOT/solaris11/var@2014-09-11-14:27:28   614K      -  97.9M  -
rpool/ROOT/solaris11/var@2014-09-11-14:36:12   654K      -  98.0M  -
rpool/ROOT/solaris11/var@2014-10-06-09:25:37  61.4M      -   136M  -
rpool/ROOT/solaris11/var@2015-01-13               0      -   101M  -
rpool/VARSHARE@2015-01-13                         0      -    88K  -
rpool/dump@2015-01-13                             0      -   768M  -
rpool/export@2015-01-13                           0      -   322M  -
rpool/export/home@2015-01-13                      0      -   730M  -
rpool/fs1@2015-01-13                              0      -    31K  -
rpool/swap@2015-01-13                             0      -  1.00G  -
root@solaris:/#

修改/etc/hosts檔,隨意加入一些字元
root@solaris:/# vi /etc/hosts
root@solaris:/# more /etc/hosts
#
# Copyright 2009 Sun Microsystems, Inc.  All rights reserved.
# Use is subject to license terms.
#
# Internet host table
#
::1             localhost
127.0.0.1       solaris localhost loghost
192.168.1.110   client
10.10.10.10 test.cht.com.tw #instanceName
rollback test
rollback test
rollback test
rollback test
rollback test
rollback test
rollback test
rollback test
rollback test
rollback test
rollback test
rollback test
rollback test
root@solaris:/#
在/var/crash目錄touch 三個檔案做rollback測試使用
root@solaris:/var/crash# ls -al
total 9
drwx------   2 root     sys            5 Jan 13 18:41 .
drwxr-xr-x   8 root     root           8 Sep  5 01:30 ..
-rw-r--r--   1 root     root           0 Jan 13 18:41 123
-rw-r--r--   1 root     root           0 Jan 13 18:41 345
-rw-r--r--   1 root     root           0 Jan 13 18:41 789
root@solaris:/var/crash#

  • 還原snapshot
PS. 每個個別的子快照也必須還原

root@solaris:~# zfs rollback -r rpool/ROOT@2015-01-13
root@solaris:~# zfs rollback -r rpool/ROOT/solaris@2015-01-13
root@solaris:~#llback -r rpool/ROOT/solaris/var@2015-01-13
root@solaris:~# zfs rollback -r rpool/ROOT/solaris11@2015-01-13
root@solaris:~# zfs rollback -r rpool/ROOT/solaris11-backup-1@2015-01-13
root@solaris:~#  zfs rollback -r rpool/ROOT/solaris11-backup-1/var@2015-01-13
root@solaris:~# zfs rollback -r rpool/ROOT/solaris11/var@2015-01-13
root@solaris:~#  zfs rollback -r rpool/VARSHARE@2015-01-13

此時系統檔案會回復到snapshot快照當時的狀態

  • 刪除snapshot
root@solaris:~# zfs destroy -r rpool@2015-01-13

Oracle ALOM 系統登入

Oracle Integrated Lights Out Manager (Oracle ILOM)系統登入


Oracle 支援  Intelligent Platform Management Interface (IPMI),分為Serial connection串列埠,及
NetMgt網路管理埠;


  • Serial connection串列埠以CLI命令列管理界面登入:


login as: root                                                               (系統預設帳號為root,密碼changeme)
Using keyboard-interactive authentication.
Password:

Oracle(R) Integrated Lights Out Manager

Version 3.2.1.8.b r88893

Copyright (c) 2014, Oracle and/or its affiliates. All rights reserved.

Warning: password is set to factory default.

Hostname: ORACLESP-1136BDRE09

-> start /SYS                                                                           (開機)            
Are you sure you want to start /SYS (y/n)? y
Starting /SYS

-> start /sp/console                                                                  (開啟console畫面)
Are you sure you want to start /SP/console (y/n)? y

Serial console started.  To stop, type #.


  • 使用網路連線連接ILOM


設定固定IP給NetMgt
-> cd  /SP/network
->set   pendingipaddress = 192.168.2.199
->set   pendingipnetmask = 255.255.255.0
->set   pendingipgateway = 192.168.2.254
->set   pendingipdiscovery = static
->set   commitpending=true 

 設定好即可使用流覽器登入

2015年1月8日 星期四

Solaris Repository Update

Solaris Repository Update


# cp install-repo.txt install-repo.ksh
# chmod +x install-repo.ksh
# ./install-repo.ksh -d /repo -I -v -c

IPS repository exists at destination /repo
Current version: 0.175.1.0.0.24.2
Do you want to add to this repository? (y/n) y

Comparing checksums of downloaded files...done. Checksums match.

Uncompressing sol-11_2-repo-1of4.zip...done.
Uncompressing sol-11_2-repo-2of4.zip...done.
Uncompressing sol-11_2-repo-3of4.zip...done.
Uncompressing sol-11_2-repo-4of4.zip...done.
Repository can be found in /repo.
Initiating repository rebuild.
Initiating repository verification.
Scanning repository (this could take some time)                     0/6383         
 /
::略
pkg://solaris/group/prerequisite/oracle/oracle-rdbms-server-12-1-preinstall  785/63                               pkg://solaris/group/prerequisite/oracle/oracle-rdbms-server-12cR1-preinstall 4164/6                             pkg://solaris/system/kernel/dynamic-reconfiguration/ultra-enterprise-10000 6182/638                                                                          
Building ISO image...done.

ISO image and instructions for using the ISO image are at:
/Create_a_Local_Repository/sol-11_2-repo.iso
/Create_a_Local_Repository/README-repo-iso.txt

2015年1月7日 星期三

Solaris 11 建立Non-GlobeZone

Solaris 11 建立Non-GlobeZone

步驟 1: 組態一個 Oracle Solaris Zone

root@NIASc11:~# zonecfg -z LDAPc25
Use 'create' to begin configuring a new zone.
zonecfg:LDAPc25> create
create: Using system default template 'SYSdefault'
zonecfg:LDAPc25> set zonepath=/rpool/LDAPc25
zonecfg:LDAPc25> set ip-type=exclusive
zonecfg:LDAPc25> add net
zonecfg:LDAPc25:net> set physical=vnic22
zonecfg:LDAPc25:net> end
zonecfg:LDAPc25> verify
zonecfg:LDAPc25> commit
zonecfg:LDAPc25> exit
root@NIASc11:~#


步驟 2: 檢視既有實體網路卡

root@NIASc11:/# dladm show-link
LINK                CLASS     MTU    STATE    OVER
net1                phys      1500   unknown  --
net3                phys      1500   unknown  --
net0                phys      1500   down     --
net2                phys      1500   unknown  --
net4                phys      1500   up       --

步驟 3: 檢視既有的zone

root@NIASc11:/# zoneadm list -cv
  ID NAME             STATUS     PATH                           BRAND    IP
   0 global           running    /                              solaris  shared
   - WPSc14           configured /rpool/WPSc14                  solaris  excl
root@NIASc11:/#


步驟 4: zone進行安裝

root@NIASc11:~# zonecfg -z LDAPc25
Use 'create' to begin configuring a new zone.
zonecfg:LDAPc25> create
create: Using system default template 'SYSdefault'
zonecfg:LDAPc25> set zonepath=/rpool/LDAPc25
zonecfg:LDAPc25> set ip-type=exclusive
zonecfg:LDAPc25> add net
zonecfg:LDAPc25:net> set physical=vnic22
zonecfg:LDAPc25:net> end
zonecfg:LDAPc25> verify
zonecfg:LDAPc25> commit
zonecfg:LDAPc25> exit
root@NIASc11:~#
root@NIASc11:~# zonecfg -z LDAPc25
zonecfg:LDAPc25>
zonecfg:LDAPc25> exit
root@NIASc11:~# zonecfg -z LDAPc25 info
zonename: LDAPc25
zonepath: /rpool/LDAPc25
brand: solaris
autoboot: false
bootargs:
file-mac-profile:
pool:
limitpriv:
scheduling-class:
ip-type: exclusive
hostid:
fs-allowed:
net:
        address not specified
        allowed-address not specified
        configure-allowed-address: true
        physical: vnic22
        defrouter not specified
anet:
        linkname: net0
        lower-link: auto
        allowed-address not specified
        configure-allowed-address: true
        defrouter not specified
        allowed-dhcp-cids not specified
        link-protection: mac-nospoof
        mac-address: random
        mac-prefix not specified
        mac-slot not specified
        vlan-id not specified
        priority not specified
        rxrings not specified
        txrings not specified
        mtu not specified
        maxbw not specified
        rxfanout not specified
        vsi-typeid not specified
        vsi-vers not specified
        vsi-mgrid not specified
        etsbw-lcl not specified
        cos not specified
        pkey not specified
        linkmode not specified
root@NIASc11:~# zoneadm -z LDAPc25 install
The following ZFS file system(s) have been created:
    rpool/LDAPc25
Progress being logged to /var/log/zones/zoneadm.20150108T013249Z.LDAPc25.install
       Image: Preparing at /rpool/LDAPc25/root.

 AI Manifest: /tmp/manifest.xml.dIamYh
  SC Profile: /usr/share/auto_install/sc_profiles/enable_sci.xml
    Zonename: LDAPc25
Installation: Starting ...

              Creating IPS image
Startup linked: 1/1 done
              Installing packages from:
                  solaris
                      origin:  http://localhost:1008/solaris/0510c4fdfd843bf4a51917054b0f1333bf49ac1c/
                      origin:  http://localhost:1008/solaris/33e7b8fb0407c4db142ba0b7e9f2a8f70fb128cd/
DOWNLOAD                                PKGS         FILES    XFER (MB)   SPEED
Completed                            187/187   34347/34347  248.9/248.9  1.6M/s

PHASE                                          ITEMS
Installing new actions                   48240/48240
Updating package state database                 Done
Updating image state                            Done
Creating fast lookup database                   Done
Installation: Succeeded

        Note: Man pages can be obtained by installing pkg:/system/manual

 done.

        Done: Installation completed in 569.785 seconds.


  Next Steps: Boot the zone, then log into the zone console (zlogin -C)

              to complete the configuration process.

Log saved in non-global zone as /rpool/LDAPc25/root/var/log/zones/zoneadm.20150108T013249Z.LDAPc25.install
root@NIASc11:~# zoneadm list -iv
  ID NAME             STATUS     PATH                           BRAND    IP
   0 global           running    /                              solaris  shared
   3 WPSc14           running    /rpool/WPSc14                  solaris  excl
   - LDAPc25          installed  /rpool/LDAPc25                 solaris  excl
root@NIASc11:~# zoneadm -z LDAPc25 boot

root@NIASc11:~#
root@NIASc11:~# zoneadm list -v
  ID NAME             STATUS     PATH                           BRAND    IP
   0 global           running    /                              solaris  shared
   3 WPSc14           running    /rpool/WPSc14                  solaris  excl
   4 LDAPc25          running    /rpool/LDAPc25                 solaris  excl
root@NIASc11:~# zlogin -C LDAPc25
[Connected to zone 'LDAPc25' console]
115/115

                           System Configuration Tool

     System Configuration Tool enables you to specify the following
     configuration parameters for your newly-installed Oracle Solaris 11
     system:
     - network, time zone, user and root accounts, name services

     System Configuration Tool produces an SMF profile file in
     /system/volatile/scit_profile.xml.

     How to navigate through this tool:
     - Use the function keys listed at the bottom of each screen to move
       from screen to screen and to perform other operations.
     - Use the up/down arrow keys to change the selection or to move
       between input fields.
     - If your keyboard does not have function keys, or they do not
       respond, press ESC; the legend at the bottom of the screen will
       change to show the ESC keys for navigation and other functions.


  F2_Continue  F6_Help  F9_Quit

Solaris 變更主機名稱

1 - 檢查目前的環境的屬性參數:

root@t3-2:~# svccfg -s system/identity:node listprop config
config                       application
config/enable_mapping       boolean     true
config/ignore_dhcp_hostname boolean     false
config/loopback             astring
config/nodename             astring     t3-2

root@t3-2:~#

目前主機名稱為t3-2

2 - 設定新的主機名稱
root@t3-2:~# svccfg -s system/identity:node setprop config/nodename="NIASc11"
root@t3-2:~# svccfg -s system/identity:node setprop config/loopback="NIASc11"
改設定主機名稱為NIASc11

3- 更新屬性參數:
root@t3-2:~# svccfg -s system/identity:node refresh
root@t3-2:~# Hostname: NIASc11

4 - 重新啟動服務:

root@t3-2:~# svcadm restart system/identity:node

5 - 確認變更完成:
root@t3-2:~# svccfg -s system/identity:node listprop config
config                       application
config/enable_mapping       boolean     true
config/ignore_dhcp_hostname boolean     false
config/nodename             astring     NIASc11
config/loopback             astring     NIASc11

2014年12月18日 星期四

Solaris 11 DNS Client 設定

Solaris 11  DNS Client 設定

檢查現有的DNS Client 設定
root@s11:~# svccfg -s network/dns/client listprop config
config                      application
config/value_authorization astring     solaris.smf.value.name-service.dns.client

更新 DNS Client 設定
root@s11:~# svccfg -s network/dns/client setprop config/nameserver = net_address: "(168.95.1.1  8.8.8.8)"

root@s11:~# svccfg -s network/dns/client setprop config/domain = astring: test.com.tw


root@s11:~# svccfg -s network/dns/client setprop config/search = astring: '("test.com.tw" "test1.com.tw")'


設定名稱解析順序
root@s11:~# svccfg -s name-service/switch setprop config/ipnodes = astring: '("files dns")'
root@s11:~# svccfg -s name-service/switch setprop config/host = astring: '("files dns")'


檢視DNS Client變更的設定
root@s11:~# svccfg -s network/dns/client listprop config
config                      application
config/value_authorization astring     solaris.smf.value.name-service.dns.client
config/nameserver          net_address 168.95.1.1 8.8.8.8
config/domain              astring     test.com.tw
config/search              astring     "test.com.tw" "test1.com.tw"
root@s11:~#


檢視nsswitch變更的設定
root@s11:~# svccfg -s name-service/switch listprop config
config                      application
config/default             astring     files
config/value_authorization astring     solaris.smf.value.name-service.switch
config/printer             astring     "user files"
config/ipnodes             astring     "files dns"
config/host                astring     "files dns"

匯出DNS Client 設定組態
root@s11:~# svcadm enable dns/client

root@s11:~# more /etc/resolv.conf                                    (此時檢視/etc/resolv.conf並不存在)
/etc/resolv.conf: No such file or directory

root@s11:~#  nscfg export svc:/network/dns/client:default
root@s11:~# more /etc/resolv.conf                                     (此時檢視/etc/resolv.conf已建立)

#
# _AUTOGENERATED_FROM_SMF_V1_
#
# WARNING: THIS FILE GENERATED FROM SMF DATA.
#   DO NOT EDIT THIS FILE.  EDITS WILL BE LOST.
# See resolv.conf(4) for details.

domain  test.com.tw
search  test.com.tw test1.com.tw
nameserver      168.95.1.1
nameserver      8.8.8.8
root@s11:~#


root@s11:~# svcadm refresh name-service/switch
root@s11:~# cat /etc/nsswitch.conf

#
# _AUTOGENERATED_FROM_SMF_V1_
#
# WARNING: THIS FILE GENERATED FROM SMF DATA.
#   DO NOT EDIT THIS FILE.  EDITS WILL BE LOST.
# See nsswitch.conf(4) for details.

passwd: files
group:  files
hosts:  files dns
ipnodes:        files dns
networks:       files
protocols:      files


root@s11:~# nscfg import -f name-service/switch:default
root@s11:~# nscfg import -f dns/client:defaul


===================分隔線 =========================================
此設定reboot 設定會清除

I. DNS client setup

1. 設定network/dns/client  SMF 服務 

# svccfg -s network/dns/client
svc:/network/dns/client> setprop config/search = astring: ("test.com.tw""test1.com.tw")
svc:/network/dns/client> setprop config/nameserver = net_address: (168.95.1.1 8.8.8.8)
svc:/network/dns/client> exit

2. 開啟 DNS client 服務 (第一次使用需要設定)

#svcadm enable -r dns/client

3.重啟/更新 DNS client 服務 (當設定完成或是有任何更新時)

#svcadm refresh dns/client

#svcadm restart dns/client

4. 檢查設定完成後/etc/resolv.conf 是否有更新(出現紅字部份)

# more /etc/resolv.conf
#
# _AUTOGENERATED_FROM_SMF_V1_
#
# WARNING: THIS FILE GENERATED FROM SMF DATA.
#   DO NOT EDIT THIS FILE.  EDITS WILL BE LOST.
# See resolv.conf(4) for details.

search           cht.com.tw cht1.com.tw
nameserver      xx.xx.xx.xx
nameserver      yy.yy.yy.yy
---

II.  設定Name service switch 使用 DNS

1. 設定 system/name-service/switch SMF 服務

# svccfg -s system/name-service/switch
svc:/system/name-service/switch> setprop config/host = astring: "files dns"
svc:/system/name-service/switch>end

2.  .重啟/更新 name-service/switch 服務

#svcadm refresh name-service/switch

#svcadm restart  name-service/switch

3. 檢查設定完成後/etc/nsswitch.conf檔,出現紅字部份的更新)

# more /etc/nsswitch.conf

#
# _AUTOGENERATED_FROM_SMF_V1_
#
# WARNING: THIS FILE GENERATED FROM SMF DATA.
#   DO NOT EDIT THIS FILE.  EDITS WILL BE LOST.
# See nsswitch.conf(4) for details.

passwd: files
group:  files
hosts:  files dns
ipnodes:        files dns

.

最後nslookup試試看DNS是否解析


2014年12月3日 星期三

Solaris 11 SSH 登入慢

Solaris 11 SSH login slow


# vi /etc/ssh/sshd_config
加入下面三行

LookupClientHostnames no
VerifyReverseMapping no
GSSAPIAuthentication no

# svcadm restart ssh