2016年8月31日 星期三

Centos 7 限制使用者群組只能使用sftp到特定目錄

為讓廠商僅能使用SFTP上傳網頁資料,所以希望限制他只能在固定的目錄操作,
所以從SSH上設定特定群組的權限,此功能也可以以限制帳號方式運作。


新增使用者
# adduser webguest

新增webeditor 群組
# groupadd webeditor


將user加入此群組
#  usermod -a -G webeditor webguest

設定要限制的目錄
# chown webguest:webeditor /data/web/xsg

設定群組讀寫權限
# chmod 755 -R /data/web/xsg

備份 /etc/ssh/sshd_config
# cp /etc/ssh/sshd_config /etc/ssh/sshd_config_org

編輯 /etc/ssh/sshd_config

Subsystem       sftp    internal-sftp                                 


Match group webeditor                                    設定webeditor這個群組
         ChrootDirectory /data/web                     限制只能在/data/web這個目錄
         AllowTcpForwarding no
         X11Forwarding no

         ForceCommand internal-sftp

重啟ssh服務
# service sshd restart


使用winscp測試,無法切換目錄僅能在特定目錄操作,也無法ssh console登入。


出現ownership 錯誤訊息如下時,參閱下面連結,將目錄權限再修改一次即可。
Aug 31 17:40:43 XSG-Web01 systemd-logind: New session 17 of user webguest.
Aug 31 17:40:43 XSG-Web01 systemd: Started Session 17 of user webguest.
Aug 31 17:40:43 XSG-Web01 systemd: Starting Session 17 of user webguest.
Aug 31 17:40:43 XSG-Web01 sshd[3911]: fatal: bad ownership or modes for chroot directory "/var/www/html" [postauth]
Aug 31 17:40:43 XSG-Web01 systemd-logind: Removed session 17.

PS . 如果要限制User或Group只能在/data/web/xsg此目錄,則要將此目錄設為User的Owner及Group,並設定為755,他的上一層/data/web一定要是root:root 

[root@Web01 web]# ls -al
total 0
drwxr-xr-x. 3 root     root      16 Sep  1 16:49     .
drwxr-xr-x. 3 root     root      16 Sep  1 16:35     ..
drwxr-xr-x. 2 webguest webeditor 49 Sep  1 16:51  xsg

Ref:
http://serverfault.com/questions/584986/bad-ownership-or-modes-for-chroot-directory-component

Centos 7 限制使用者群組只能使用sftp到特定目錄

為讓廠商僅能使用SFTP上傳網頁資料,所以希望限制他只能在固定的目錄操作,
所以從SSH上設定特定群組的權限,此功能也可以以限制帳號方式運作。


新增使用者
# adduser webguest

新增webeditor 群組
# groupadd webeditor

將user加入此群組
#  usermod -a -G webeditor webguest

設定要限制的目錄
# chgrp -R webeditor /var/www/html

設定群組讀寫權限
# chmod -R 775 /var/www/html

備份 /etc/ssh/sshd_config
# cp /etc/sshd_config /etc/sshd_config_org

編輯 /etc/ssh/sshd_config

Subsystem       sftp    internal-sftp                                 


Match group webeditor                                            設定webeditor這個群組
         ChrootDirectory /var/www/html                     限制只能在/var/www/html這個目錄
         AllowTcpForwarding no
         X11Forwarding no

         ForceCommand internal-sftp

重啟ssh服務
# service sshd restart


使用winscp測試,無法切換目錄僅能在特定目錄操作,也無法ssh console登入。


2016年5月4日 星期三

HP DL380 G8 iLO設定及使用Remote Cosole


在開機POST到這畫面時,按F8功能鍵


設定IP,及將網卡設為ON


新增帳號及設定密碼


使用流覽器登入設定的iLO IP

登入iLO,可看到系統硬體資訊
選擇Remote Console
掛載ISO檔安裝系統


使用Remote Console安裝開始


2016年3月9日 星期三

find 指令的10個運用


Ref :
 http://javarevisited.blogspot.tw/2011/03/10-find-command-in-unix-examples-basic.html#.VqL52pdz2yo.linkedin

2016年2月17日 星期三

Kali Linux 設定RDP,使用遠端桌面連線

設備環境

Raspberry Pi  2 B  +kali linux   3.18.16-v7


安裝xrdp時,會出現兩個相依的程式未安裝問題

root@kali:/# apt-get install xrdp
Reading package lists... Done
Building dependency tree
Reading state information... Done
You might want to run 'apt-get -f install' to correct these:
The following packages have unmet dependencies:
 raspi-config : Depends: lua5.1 but it is not going to be installed
                   Depends: triggerhappy but it is not going to be installed
E: Unmet dependencies. Try 'apt-get -f install' with no packages (or specify a solution).

解決相依程式未安裝

root@kali:/# apt-get -f install
Reading package lists... Done
Building dependency tree
Reading state information... Done
Correcting dependencies... Done
The following extra packages will be installed:
  lua5.1 triggerhappy
The following NEW packages will be installed:
  lua5.1 triggerhappy
0 upgraded, 2 newly installed, 0 to remove and 52 not upgraded.
1 not fully installed or removed.
Need to get 106 kB of archives.
After this operation, 333 kB of additional disk space will be used.
Do you want to continue? [Y/n] y

root@kali:/# apt-get update
root@kali:/# apt-get upgrade

開啟xrdp服務

root@kali:/# service xrdp start

將xrdp服務設定於開機時啟動

root@kali:/# update-rc.d xrdp enable

使用Windows遠端桌面程式


開啟wireshark測試


PS.平日使用ssh操作,CLI的環境算是非常流暢,但使用遠端桌面後,速度有些頓,有可能是PC和Pi都是用我的手機無線分享,但瑕不掩瑜GUI操作還算勘用。


2016年1月26日 星期二

Raspberry Pi 2 B+ 安裝Web Cam - Logitech, Inc. QuickCam Orbit/Sphere AF


root@raspberrypi:~# apt-get update
root@raspberrypi:~# apt-get upgrade


插入QuickCam 至Pi的USB Port ,即偵測到WebCam

root@raspberrypi:~# lsusb
Bus 001 Device 008: ID 046d:0994 Logitech, Inc. QuickCam Orbit/Sphere AF
Bus 001 Device 006: ID 7392:7811 Edimax Technology Co., Ltd EW-7811Un 802.11n Wireless Adapter [Realtek RTL8188CUS]
Bus 001 Device 005: ID 040b:2000 Weltrend Semiconductor
Bus 001 Device 004: ID 046d:c016 Logitech, Inc. Optical Wheel Mouse
Bus 001 Device 003: ID 0424:ec00 Standard Microsystems Corp. SMSC9512/9514 Fast Ethernet Adapter
Bus 001 Device 002: ID 0424:9514 Standard Microsystems Corp.
Bus 001 Device 001: ID 1d6b:0002 Linux Foundation 2.0 root hub
root@raspberrypi:~#


root@raspberrypi:~# ls -al /dev/video*
crw-rw----+ 1 root video 81, 0 Jan 26 15:16 /dev/video0
root@raspberrypi:~#

安裝fswebcam

root@raspberrypi:/# apt-get install fswebcam

測試拍一張

root@raspberrypi:/tmp# fswebcam -d /dev/video0 test.jpg
--- Opening /dev/video0...
Trying source module v4l2...
/dev/video0 opened.
No input was specified, using the first.
Adjusting resolution from 384x288 to 352x288.
--- Capturing frame...
Captured frame in 0.00 seconds.
--- Processing captured image...
Writing JPEG image to 'test.jpg'.


可以順利拍照

============================================================

安裝motion
root@raspberrypi:~# apt-get install motion
root@raspberrypi:~# mkdir /tmp/motion
root@raspberrypi:~# chown -R 777 /tmp/motion
root@raspberrypi:~# chown -R 777 /etc/motion/motion.conf
root@raspberrypi:~# vi /etc/default/motion

start_motion_daemon=yes
stream_localhost off


root@raspberrypi:~# vi /etc/motion/motion.conf 
webcontrol_localhost off

root@raspberrypi:~# service motion restart

打開瀏覽器 http://IP :8081 就可以看到即時影像


Ref:.
http://sourceforge.net/projects/motion/
https://www.raspberrypi.org/documentation/usage/webcams/
http://tekibrain.blogspot.tw/2013/05/raspberry-pi-webcam-motion-webcam-server.html
http://pimylifeup.com/raspberry-pi-webcam-server/
http://gsyan888.blogspot.tw/2013/04/raspberry-pi-webcam-server.html


2016年1月25日 星期一

Hypriot OS 變更地理時區


# dpkg-reconfigure tzdata

選擇亞洲


台北


$ date          
Tue Jan 26 09:37:31 CST 2016


2016年1月22日 星期五

Hypriot Docker 安裝


顯示本機執行中的containers

$ docker ps
CONTAINER ID        IMAGE                       COMMAND                  CREATED             STATUS              PORTS                NAMES
82dbcd2dde31        hypriot/rpi-busybox-httpd   "/bin/busybox httpd -"   43 minutes ago      Up 43 minutes       0.0.0.0:80->80/tcp   suspicious_swanson

hypriot/rpi-busybox-httpd是一個相容於Pi,極小的Web Server   


顯示本機已有的image
$ docker images
REPOSITORY                  TAG                 IMAGE ID          CREATED        VIRTUAL SIZE
hypriot/rpi-node                 latest              83e03457af7c        8 days ago          439.4 MB
hypriot/rpi-swarm              latest              039c550f6208        11 weeks ago        10.92 MB
hypriot/rpi-busybox-httpd  latest              c7278d0bf2e2        7 months ago        2.156 MB


從倉庫中拉取python的image
https://hub.docker.com/u/hypriot/

$ docker pull hypriot/rpi-python
Using default tag: latest
latest: Pulling from hypriot/rpi-python
45e02ebea2b8: Pull complete
02d3cdf670b3: Pull complete
bd4c567603b9: Pull complete
faa3e8795c2e: Pull complete
11b7752e491d: Pull complete
be9e5169c10b: Pull complete
c77ff6dc5453: Download complete
c77ff6dc5453: Extracting [===>                                               ] 3.342 MB/53.43 MB
a49bf7a9282b: Download compl

$ docker images
REPOSITORY                  TAG                 IMAGE ID            CREATED             VIRTUAL SIZE
hypriot/rpi-node             latest              83e03457af7c        8 days ago          439.4 MB
hypriot/rpi-python          latest              a49bf7a9282b        4 weeks ago         193.8 MB
hypriot/rpi-swarm           latest              039c550f6208        11 weeks ago        10.92 MB
hypriot/rpi-busybox-httpd   latest          c7278d0bf2e2        7 months ago        2.156 MB
HypriotOS: root@black-pearl in ~

可以見到python的image已經下載完畢.


顯示本機Docker系統訊息
$ docker info
Containers: 4
Images: 26
Server Version: 1.9.0
Storage Driver: overlay
 Backing Filesystem: extfs
Execution Driver: native-0.2
Logging Driver: json-file
Kernel Version: 4.1.12-hypriotos-v7+
Operating System: Raspbian GNU/Linux 8 (jessie)
CPUs: 4
Total Memory: 925.5 MiB
Name: black-pearl
ID: 736P:3MZH:Q4BH:XGBS:KZJF:WBKU:6DPG:V5TT:C6FT:APFV:2OYL:HHAY
Debug mode (server): true
 File Descriptors: 20
 Goroutines: 35
 System Time: 2016-01-22T08:56:59.095379835+01:00
 EventsListeners: 0
 Init SHA1: 5246a6ddd203054e34d43c740f96958125d00994
 Init Path: /usr/lib/docker/dockerinit
 Docker Root Dir: /var/lib/docker


2016年1月21日 星期四

啟動Pi的HypriotOS Docker


HypriotOS: root@black-pearl in ~
$ docker run -d -p 80:80 hypriot/rpi-busybox-httpd
Unable to find image 'hypriot/rpi-busybox-httpd:latest' locally
latest: Pulling from hypriot/rpi-busybox-httpd
af1721be47cc: Pull complete
6ace3cef50ed: Pull complete
27616286225e: Pull complete
c7278d0bf2e2: Pull complete
Digest: sha256:c00342f952d97628bf5dda457d3b409c37df687c859df82b9424f61264f54cd1
Status: Downloaded newer image for hypriot/rpi-busybox-httpd:latest
82dbcd2dde31381c6d7d50d77acad47ce9b13ab742697247474bc8dc6c63777b
HypriotOS: root@black-pearl in ~


檢查Container是否執行中
$ docker ps
CONTAINER ID        IMAGE                       COMMAND                  CREATED             STATUS                               PORTS                NAMES
82dbcd2dde31        hypriot/rpi-busybox-httpd   "/bin/busybox httpd -"   3 minutes ago       Up 3 minutes                         0.0.0.0:80->80/tcp   suspicious_swanson
HypriotOS: root@black-pearl in ~

使用連覽器,輸入Pi的IP,即可看到Docker運作正常


HypriotOS: root@black-pearl in
~
$ docker pull hypriot/rpi-node
Using default tag: latest
latest: Pulling from hypriot/rpi-node
ec8335713f0c: Downloading [==============>                                    ] 9.447 MB/32.96 MB
4c3d8ef12d9b: Download complete
d9fa11102e78: Download complete
7fbbbb041e3b: Download complete
e612d93ea879: Download complete
d15d41e77226: Download complete
b32d2fa0b89d: Download complete
7ce868a4c3e4: Download complete
7dc91ec075ed: Downloading [==>                                                ] 5.388 MB/114.2 MB
1ef398dbdeea: Download complete
993e312b40c7: Download complete
3a5c40738b4e: Download complete
6fdb7b5d4b58: Downloading [=====================>                             ] 4.806 MB/11.23 MB
83e03457af7c: Download complete


2016年1月19日 星期二

Raspberry Pi 2 安裝Hypriot Docker

  • 安裝Hypriot

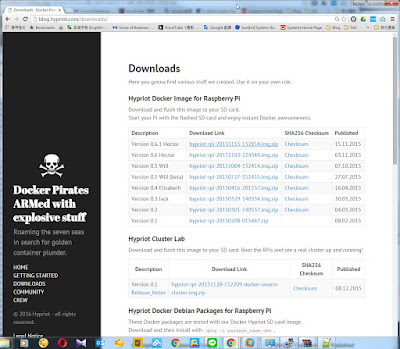
下載Hypriot Docker Image檔
http://blog.hypriot.com/downloads/


解壓縮 hypriot-rpi-20151115-132854.img.zip

下載Win32 Disk Imager
http://sourceforge.net/projects/win32diskimager/
PS. 指定Device時要注意磁碟ID,以免刪除磁碟資料


將OS寫入之SD插入Pi後開機,
帳號:root 密碼:hypriot


  • 設定固定IP
vi /etc/network/interface

iface eth0 inet static
        address 172.16.37.219
        netmask 255.255.255.0
        gateway 172.16.37.254


  • 設定Wifi 固定IP

vi /etc/network/interface

allow-hotplug wlan0
iface wlan0 inet static
        address 192.168.1.101
        netmask 255.255.255.0
        gateway 192.168.1.1


vi /etc/wpa_supplicant/wpa_supplicant.conf
加入下面資訊
ctrl_interface=DIR=/var/run/wpa_supplicant GROUP=netdev
update_config=1

network={
    ssid="輸入SSID "
    proto=RSN
    key_mgmt=WPA-PSK
    pairwise=CCMP TKIP
    group=CCMP TKIP
    psk="輸入密碼"
}
重新啟動無線網卡介面

# sudo ifdown wlan0
# sudo ifup wlan0
使用putty試試看是否可以登入


2016年1月14日 星期四

Ubuntu 15.10 Desktop 由DHCP改為固定IP


  • 快速檢查可用的網路卡,由下可見是找不到名為eth的網路


root@lulu:~# ifconfig -a |grep eth


  • 使用lshw指令找尋網卡,由下可見,不見得每張網卡都叫eth,目前OS VM使用Alfa Usb無線網卡,名稱為enp0s3

root@lulu:/etc/network# lshw -class network
USB
  *-network
       description: Ethernet interface
       product: 82540EM Gigabit Ethernet Controller
       vendor: Intel Corporation
       physical id: 3
       bus info: pci@0000:00:03.0
       logical name: enp0s3
       version: 02
       serial: 08:00:27:62:75:7a
       size: 1Gbit/s
       capacity: 1Gbit/s
       width: 32 bits
       clock: 66MHz
       capabilities: pm pcix bus_master cap_list ethernet physical tp 10bt 10bt-fd 100bt 100bt-fd 1000bt-fd autonegotiation
       configuration: autonegotiation=on broadcast=yes driver=e1000 driverversion=7.3.21-k8-NAPI duplex=full ip=192.168.1.122 latency=64 link=yes mingnt=255 multicast=yes port=twisted pair speed=1Gbit/s
       resources: irq:19 memory:f0000000-f001ffff ioport:d010(size=8)
root@lulu:/etc/network#


  • 修改檔案/etc/network/interfaces  ,
設定固定IP為192.168.1.151/24 ,Gateway為192.168.1.1


auto lo
iface lo inet loopback
iface enp0s3 inet static
address 192.168.1.151
netmasks 255.255.255.0
network 192.168.1.0
broadcast 192.168.1.255
gateway 192.168.1.1
dns-nameservers 168.95.1.1

Ubuntu 15.10 Desktop 安裝SSH Client及Server

在Ubuntu 15.10 Desktop 版本SSH Client及Server預設是沒有安裝的

安裝Client
# apt-get install openssh-client

安裝Server
# apt-get install openssh-server

啟動ssh
# /etc/init.d/ssh start

試試看ssh 登入本機
# ssh 0
The authenticity of host '0 (0.0.0.0)' can't be established.
ECDSA key fingerprint is SHA256:qFeEjQWcHob14QHE4r888zKX5X6FftQVos5UXQBbCeo.
Are you sure you want to continue connecting (yes/no)?

2016年1月13日 星期三

ZFS Storage 7320 Software Updates


軟體下載網址
https://wikis.oracle.com/display/FishWorks/Software+Updates
下載最新版本,下載後需要將.zip檔案解壓縮

 按Available Updates鍵


 選擇已解壓縮的Patch

安裝進度

 已上載完成

 延遲更新選項

選擇自動則立即更新


PS. 如果Cluster Node,另一座亦需做更新。


VMware Workstation 設定綁定的實體網卡


由Edit -> Virtual Network Editor->Add Network 
選擇網卡(在此使用USB無線網卡)


在VM的設定選定綁定的網卡


2016年1月7日 星期四

Reset MySQL root 密碼


先將mysql 關閉
[root@centos ~]# service mysqld stop
Stopping mysqld:                                           [  OK  ]
[root@centos ~]#
[root@centos ~]# mysqld_safe --skip-grant-tables &
Starting mysqld daemon with databases from /var/lib/mysql
[root@centos ~]# mysql -u root
mysql> use mysql;
mysql> UPDATE user SET Password=PASSWORD("password") WHERE User='root';
mysql> flush privileges;
mysql> quit


Solaris 11 OS 由光碟機開機,mount ZFS


使用光碟機開機
設備Oracle T3-2   Solaris 11.2 光碟片


OK boot dvdrom


root@solaris:/root# df -h
Filesystem             Size   Used  Available Capacity  Mounted on
/devices/ramdisk-root:a
                       248M   216M        32M    88%    /
/devices                 0K     0K         0K     0%    /devices
略 
/dev/dsk/c2t7d0s2      731M   731M         0K   100%    /media/Oracle_Solaris-11_2-Text-SPARC


root@solaris:/root# mount /dev/dsk/c0t5000CCA01297BDE0d0s0 /mnt
Apr 16 03:28:28 solaris ufs: NOTICE: mount: not a UFS magic number (0x0)
mount: /dev/dsk/c0t5000CCA01297BDE0d0s0 is not this fstype


root@solaris:/etc# df -h
Filesystem             Size   Used  Available Capacity  Mounted on
/devices/ramdisk-root:a
                       248M   216M        32M    88%    /
/devices                 0K     0K         0K     0%    /devices
略 
/dev/dsk/c2t7d0s2      731M   731M         0K   100%    /media/Oracle_Solaris-11_2-Text-SPARC
rpool/export           274G    32K       109G     1%    /a/export
rpool/export/home      274G    32K       109G     1%    /a/export/home
rpool/export/home/mds
                       274G    67K       109G     1%    /a/export/home/mds
rpool                  274G    78K       109G     1%    /a/rpool
rpool/LDAPc25          274G    34K       109G     1%    /a/rpool/ldap
rpool/WPSc14           274G    34K       109G     1%    /a/rpool/wall
rpool/ldadc25-clone    274G    35K       109G     1%    /a/rpool/ldap-clone
root@solaris:/etc#

ZFS boot disk 更換成較大容量的硬碟


在有些時候我們需要更換開機硬碟,或是既有硬碟容量太小,欲更換成較大的硬碟,ZFS 與過去UFS的做法有些不同,UFS常用的方法為ufsdump 跟ufsrestore方式,而ZFS使用mirror操作,更為快速及方便。

使用設備Oracle SPARC T3-2,開機硬碟為146GB硬碟,欲改成300GB硬碟


檢視目前機器內的硬碟: 
AVAILABLE DISK SELECTIONS:
       0. c0t5000C5000EBDE997d0 <SUN146G cyl 14087 alt 2 hd 24 sec 848>
          /scsi_vhci/disk@g5000c5000ebde997/dev/chassis//SYS/SASBP/HDD0/disk
       1. c0t5000C50039BD744Bd0 <SEAGATE-ST930003SSUN300G-0B70 cyl 46873 alt 2 hd 20      sec 625> /scsi_vhci/disk@g5000c50039bd744b/dev/chassis//SYS/SASBP/HDD1/disk


檢示zpool 狀態
# zpool statu tus -v
  pool: rpool
 state: ONLINE
  scan: resilvered 70.0G in 0h18m with 0 errors on Tue Oct 27 13:08:53 2015
config:

        NAME                       STATE     READ WRITE CKSUM
        rpool                      ONLINE       0     0     0
          c0t5000C5000EBDE997d0s6  ONLINE       0     0     0

檢示磁區狀態  (現為146GB)
# df -h
Filesystem             Size   Used  Available Capacity  Mounted on
rpool/ROOT/solaris     134G   2.1G        62G     4%    /
/devices                 0K     0K         0K     0%    /devices


將第二顆硬碟(300GB)與開機硬碟mirror
# zpool attach -f rpool c0t5000C5000EBDE997d0s6 c0t5000C50039BD744

檢視mirror進度,須等兩顆資料同步後100%再行拆開
# zpool status -v
  pool: rpool
 state: DEGRADED
status: One or more devices is currently being resilvered.  The pool will
        continue to function in a degraded state.
action: Wait for the resilver to complete.
  scan: resilver in progress since Tue Oct 27 14:44:52 2015
    4.10G scanned out of 70.0G at 45.2M/s, 0h24m to go
    4.10G resilvered, 5.86% done
config:

        NAME                         STATE     READ WRITE CKSUM
        rpool                        DEGRADED     0     0     0
          mirror-0                   DEGRADED     0     0     0
            c0t5000C5000EBDE997d0s6  ONLINE       0     0     0
            c0t5000C50039BD744Bd0s6  DEGRADED     0     0     0  (resilvering)

device details:

        c0t5000C50039BD744Bd0s6    DEGRADED       scrub/resilver needed
        status: ZFS detected errors on this device.
                The device is missing some data that is recoverable.
           see: http://support.oracle.com/msg/ZFS-8000-QJ for recovery


errors: No known data errors

Mirror 完成
# zpool status -v
  pool: rpool
 state: ONLINE
  scan: resilvered 70.0G in 0h18m with 0 errors on Tue Oct 27 15:03:07 2015
config:

        NAME                         STATE     READ WRITE CKSUM
        rpool                        ONLINE       0     0     0
          mirror-0                   ONLINE       0     0     0
            c0t5000C5000EBDE997d0s6  ONLINE       0     0     0
            c0t5000C50039BD744Bd0s6  ONLINE       0     0     0

errors: No known data errors

建立第二顆硬碟(300GB)開機磁區
# installboot -F zfs /usr/platform/`uname -i`/lib/fs/zfs/bootblk /dev/rdsk/c0t5000C50039BD744Bd0s6
WARNING: target device /dev/rdsk/c0t5000C50039BD744Bd0s6 has a versioned bootblock but no versioning information was provided.
bootblock version installed on /dev/rdsk/c0t5000C50039BD744Bd0s6 is more recent or identical
Use -F to override or install without the -u option

要從第二顆硬碟開機,先將系統下至OK Mode
# init 0

設定好裝置別名,方便開機使用,第一顆命名為rootdisk,第二顆命名為rootmir
{0} ok devalias
screen                   /pci@400/pci@1/pci@0/pci@0/pci@0/display@0
mouse                    /pci@400/pci@1/pci@0/pci@b/pci@0/usb@0,2/hub@2/device@4/mouse@1
rootdisk                 /pci@400/pci@2/pci@0/pci@e/scsi@0/disk@w5000c5000ebde995,0:g
rootmir                  /pci@400/pci@2/pci@0/pci@e/scsi@0/disk@5000c50039bd7449,0:g

由第二顆開啟(300GB)
{0} ok boot rootmir
Boot device: /pci@400/pci@2/pci@0/pci@e/scsi@0/disk@5000c50039bd7449,0:g  File and args:

檢視zpool狀態
# zfspool status -v
  pool: rpool
 state: ONLINE
  scan: resilvered 70.0G in 0h18m with 0 errors on Tue Oct 27 15:03:07 2015
config:

        NAME                         STATE     READ WRITE CKSUM
        rpool                        ONLINE       0     0     0
          mirror-0                   ONLINE       0     0     0
            c0t5000C5000EBDE997d0s6  ONLINE       0     0     0
            c0t5000C50039BD744Bd0s6  ONLINE       0     0     0

將第一顆硬碟(146GB)從rpool 移除
# zpool detach rpool c0t5000C5000EBDE997d0s6

檢視zpool狀態
# zpolol stat -vatus -v
  pool: rpool
 state: ONLINE
  scan: resilvered 70.0G in 0h18m with 0 errors on Tue Oct 27 15:03:07 2015
config:

        NAME                       STATE     READ WRITE CKSUM
        rpool                      ONLINE       0     0     0
          c0t5000C50039BD744Bd0s6  ONLINE       0     0     0

errors: No known data errors

檢示磁區狀態  (變成300GB大小了)
# df -h
Filesystem             Size   Used  Available Capacity  Mounted on
rpool/ROOT/solaris     275G   2.1G       202G     2%    /